 | CCLA Correspondence Chess |
| Copyright © 2005– by CCLA. All rights reserved. |
| [top] |
How To ... |
 |
| Part I. The Basics |
|
• Rules of Chess • Board and Chessmen • Initial Position • Touch-Move Rule • Chess Notation • FEN Notation • Movement of the Chessmen • "En passant" Pawn Captures • Pawn Promotion • Under-Promotion • Castling |
| Part II. More to learn |
|
• Three Phases of a Game • Table of Relative Values • Theory of Exchanging • Combination • Mating Attack • Position Play • Drawn Games • Winning a Chess Game • The Four Basic Checkmates • Basic K+P vs. K Endgame • Suggestions for Further Study |
Know the Rules! |
It should be obvious that someone cannot play chess (or any other game) without understanding the rules, yet beginners frequently attempt to play without having studied all the Official Rules of Chess. Well-meaning but unskilled players (and most how to webmasters) omit important details or pass along misinformation which beginners accept unquestioningly, contributing to their difficulties later on. The following topics are designed to help new players transition from reading to understanding chess rules and fundamentals. |
| [top] |
Board and Chessmen |
Chess is played between two opponents on a board divided into 8 rows and 8 columns, a total of 64 squares of alternating colors. The board is called a chess board, never a checker board. Squares form patterns called ranks (horizontal rows), files (vertical rows), diagonals, and larger groups such as the center, the extended center, the wings, the king-side, the queen-side and so forth. Chess boards for tournament play are wood, wood-grained folding boards or else vinyl roll-up boards; colors are brown and buff or green and eggshell to minimize eye strain. Hint: do NOT bring a red and black checker board to a chess tournament. |
Despite their uniform (other than color) appearance, novice players soon realize all squares are not equal. An individual square may have strategic significance, such as an outpost square for an advanced piece, a "hole" in a pawn formation or a "stop" square to prevent a passed pawn's advance. Similarly, a group of squares may form a critical area such as the center, an open file, the seventh rank or a "weak square complex." It is the rules of chess, the movements of the various chessmen and the geometry of the chess board that combine to give the game its charm and complexity. |
Chess is played with a chess set of 32 pieces. The set may be wood or plastic, but only the Staunton pattern chess set (pictured below) is allowed in official tournaments such as those played under FIDE (int'l) or USCF (USA) rules. (Hint: do NOT bring your prized Civil War generals, Aztec gods or Star Trek chess set to an official tournament.) |
 |
Each player begins a game with 16 chessmen: 1 king, 1 queen, 2 rooks, 2 bishops, 2 knights, and 8 pawns. Pieces is a term often used collectively to mean all the chessmen; technically, pieces are different from pawns. The major or heavy pieces are the queen and rooks; the minor pieces are the bishops and knights. White has the lighter colored set of chessmen, Black has the darker colored set. Chess sets come in a variety of styles, materials and colors, but for the sake of uniformity the two sides are referred to as "white" and "black". A piece that looks like a medieval tower is called a rook, not a "castle". The chess terms "castle" and "castling" involve the one-time movement of a king and a rook together and are explained under "Castling" below. The piece that looks like a horse's head is called a knight, never a "horse." |
| [top] |
Initial (Starting) Position |
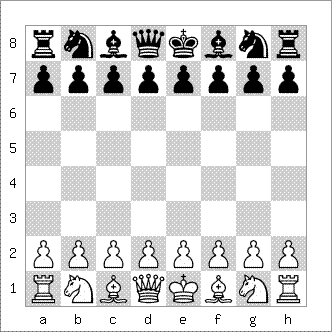 |
|
White always makes the first move of the game, then players take turns until the game ends. A player may not make two moves in a row. A player may not skip his turn. While it may be desirable, even necessary, to "lose" a move (see "Triangulation") players must make a legal move each time it is their turn to move. All moves must be legal moves. If it is discovered later on in a game that an illegal move has occurred, the position just prior to the illegal move is restored, the guilty player must make a legal move (see Touch-Move Rule) and play resumes from that point. If the position cannot be restored, the game is annulled and a new game is begun. If such a situation occurs in a tournament, players must seek assistance from the tournament director with regard to verifying the position, re-setting time clocks and/or starting a new game. |
| [top] |
The Touch-Move Rule |
In tournament chess, whichever piece or pawn a player touches first must be moved. As long as the player has his hand on it, he may move that piece to any legal square, but move it he must. Also, there are no take backs in chess; once his hand releases the piece, it must stay on that square, no matter what the consequence. Note: players may not make illegal moves. If a move is determined to be illegal, touch-move requires that the piece touched must be moved to a legal square. If it is determined the touched piece has no legal moves, then the player may make any legal move. Do your thinking before you move, not during the process of making your move on the board. When it is your turn and before you make your next legal move, if you wish to adjust any of your chessmen on the board, you must say j'adoube ("I adjust" in English) to your opponent before touching anything. |
| [top] |
Chess Notation |
| How Chess Games are Recorded |
The system for recording and publishing the moves of chess games is called chess notation. There have been several notation systems throughout
the history of chess, but today the universal standard notation is Algebraic Notation, so named because the board is divided into a matrix or grid, with numbers 1-8
designating the ranks (from white's point of view) and the letters a-h designating the files, starting from white's extreme left with "a," etc. As shown in Diagram 24.
below, each of the 64 squares on the board has a unique letter/number coordinate. Compared with Descriptive Notation, Algebraic Notation reduces but does not totally
eliminate the possibility of ambiguous notation of moves. When two of the same kind of piece can move to the same square, typically knights and rooks, it is necessary
to add "qualifiers" to the move's notation. For example, (white has knights on the a1 and a5 squares), the move 20. Nb3 is ambiguous because we don't know which knight
moved to the b3 square. It is therefore necessary to add a "qualifier" such as 20.N1b3 or else 20.N5b3 to distinguish between the two possibilities. Similarly (white has
knights on the a1 and c1 squares), 20.Nb3 would be ambiguous and must be written 20.Nab3 or else 20.Ncb3.
|
 |
Typical chess font used in diagrams |
Figurine (algebraic) notation just substitutes chess diagram symbols of pieces and pawns for the English letters K,Q,R,B,N,P. Publishers of chess books
and magazines use chess fonts to make their books understandable in all languages. Chess fonts even appear on web sites and blogs. |
| Black |  |
| White |
| Algebraic Notation - coordinates |
|
Below is a sample game. If you are just learning Algebraic Notation, try playing through the game manually using the blue triangle control rather than auto-play (triangle in circle.) As you step through each move on the board, it is highlighted in the pgn below and you see the correct notation. | |||
|
| [top] |
Forsythe Notation |
Forsythe-Edwards Notation, or FEN, is a shorthand system to record a chess position. While there are technical standards, the average
player can get by with the following. The ranks are recorded in descending order, starting with black's back rank and moving down the position to white's first rank. In
algebraic notational terms, rank 8 to rank 1. Each rank or row must total 8, a combination of piece symbols and numbers representing unoccupied squares, written left to
right. FEN positions are always recorded from white's side of the board. Ranks are separated by a forward slash ("/"). The symbols for white's pieces are K,Q,R,B,N,P and
for black's pieces, k,q,r,b,n,p. One should also note which player is on the move (side to move.) The FEN string is quite useful for adjourned games at tournaments, so that
players do not need to play through an entire game score to set-up the position for the next playing session. |
rnbqkbnr/pppppppp/8/8/8/8/PPPPP |
The first letter
(w) after white's first rank alignment tells the software which side is on the move and the final number is the current move number. The FEN string for the final position
of the sample game above is: |
| [top] |
Movement of the Chessmen |
When moving a chessman, it is placed in the center of a square, not on the intersection of squares (see "jadoube" rule.) Only one chessman may occupy a square at one time. Capturing is optional unless it is the only way to get one's king out of check, or it is the only legal move. Capturing is done by displacement; the captured piece or pawn is removed from the board and the capturing piece or pawn replaces it on that square. The knight does not capture pieces or pawns it jumps over; only the piece or pawn that occupies its landing square is captured. A player may not capture his own men. The diagrams below show White's knight capturing the enemy bishop. Diagram 1 is the position before the capture, Diagram 2 is the position after White has played Nxe6, capturing the bishop. |
 |
| Diagram 1. |
 |
| Diagram 2. |
| [top] |
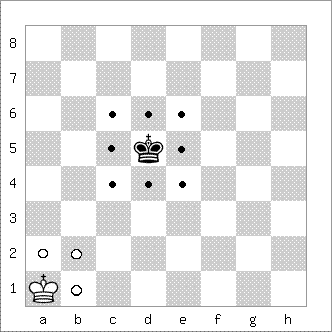
The King |
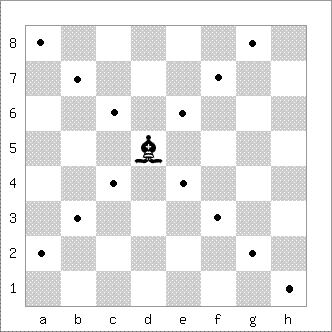
A king may move one square in any direction, except the king cannot move into check and cannot move next to the opposing king; there must always be one empty square between them, horizontally, vertically or diagonally. These two restrictions placed on the king's movement are the basis of the fundamental checkmates outlined below (see Basic Checkmates.) Diagram 3 shows all possible moves for the kings. The White king has five legal moves, to any square designated by a white circle; the Black king also has five legal moves, to any square designated by a black circle. Neither king may move to a square marked with an "X", because of the requirement that one square must always separate them. |
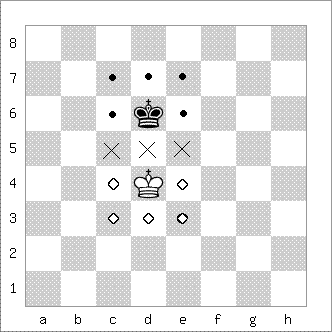 |
| Diagram 3. |
The two kings in Diagram 3 stand "in direct opposition," meaning they are one square apart on a line; two kings can be in opposition on a file, rank or diagonal. The king whose turn it is to move loses "the opposition"; no matter where he moves, the opposing king will be able to occupy at least one of the squares previously designated "X." When two or more squares separate the kings they are said to be in "distant opposition." If there is an odd number (1, 3 or 5) of squares between them, the side not on the move holds the distant opposition. If there is an even number (2, 4 or 6) of squares between them, the side on the move will gain the distant opposition by moving forward, changing the square count between them to an odd number. |
 |
| Diagram 4. |
Diagram 4 shows how a king's mobility decreases as it moves from the center to the perimeter of the board. The black king in the middle of the board has eight possible moves, to any one of the squares marked with a black circle, while the white king in the corner has only three legal moves, to any one of the squares marked with white circles. This lack of mobility (move options) is the reason most checkmates (see section on "Winning a Chess Game") occur at the edges or on the corners of the board. It's much easier for the aggressor to control three to five squares than eight squares. |
| [top] |
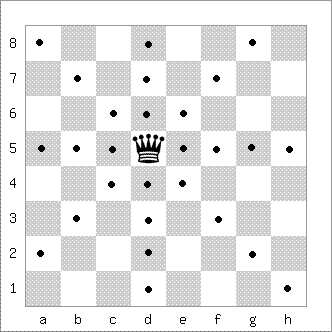
The Queen |
The queen may move across as many open squares as there are in a straight line, horizontally, vertically or diagonally. The queen may not jump over any pieces, either its own or enemy units. Diagram 5 demonstrates the black queen on an open board can move to any one of the 27 squares designated with a black circle. In diagram 6, however, we see the black queen's mobility reduced to 12 squares by the presence of other pieces. Note the queen can move up to or including a square occupied by an enemy unit, in which case the queen would capture that chessman. |
 |
| Diagram 5. |
 |
| Diagram 6. |
| [top] |
The Rook |
The rook may move across as many open squares as there are in a straight line, horizontally or vertically but never diagonally. The rook may not jump over any pieces, either its own or enemy units. Diagram 7 demonstrates the black rook on an open board can move to any one of the 14 squares designated with a black circle. Note: the mobility of the rook on an open board does not diminish as it moves away from the center. No matter where you place the rook on an open board, it will have 7 squares horizontally and 7 squares vertically to which it can move. Diagram 8 shows the mobility of a rook is reduced by the presence of other chessmen; here the white rook has a total of seven legal moves, including two captures, to squares marked with a white circle. |
 |
| Diagram 7. |
 |
| Diagram 8. |
| [top] |
The Bishop |
The bishop may move across as many open squares as there are in a diagonal line, never horizontally or vertically. Each player starts off the game with a "light-square bishop" and a "dark-square bishop." A bishop is limited to the 32 squares of it's own color. In Diagram 9, the "light-square" black bishop has 13 squares to which it may move, marked with black circles. The bishop may not jump over any pieces, either its own or enemy units. In Diagram 10, white's "dark-square" bishop has a total of 8 squares to which it may move, marked with a white circle, with one being capture of the enemy knight. |
 |
| Diagram 9. |
 |
| Diagram 10. |
| [top] |
The Knight |
The knight's "L-shaped" movement is two squares up or down vertically, then one square to the left or right horizontally, or else two squares horizontally, then one square up or down vertically. Note: the knight always ends up on a square the opposite color from the square it started from. In Diagram 11, the black knight can move to any one of the 8 squares marked with a black circle. The knight is the only piece that may jump over other chessmen, either those of its own color or those of the enemy. As was noted in the section on capturing, the knight does not capture pieces or pawns that it jumps over; only the piece or pawn that occupies its landing square is captured. In diagram 12, white's knight has five legal moves, the squares marked by a white circle, two of which are captures of enemy units. |
 |
| Diagram 11. |
 |
| Diagram 12. |
| [top] |
The Pawn |
The pawn moves forward on its file, one square at a time. The exception is the pawn's first move in the
game; each pawn has the option of advancing one or two squares on its first move only. Thereafter, it may only move one square at a
time. This option cannot be saved for later use - it only applies to each pawn's very first move in the game. If another piece or
pawn stands on its file, it is said to be "blocked" and may not move forward until the blockade has been removed. Unlike the other
pieces, the pawn can never move backwards. In Diagram 13 below, all white's pawns may move one or two squares forward except the
e-pawn already moved; this pawn is blocked by a black pawn and cannot advance until the blockade is removed. When that happens,
the pawn can only move forward one square at a time. The same applies to the black pawn pictured here. |
 |
| Diagram 13. |
A pawn captures diagonally, on the square(s) one square ahead; a pawn cannot capture anything directly in front of, beside or behind it. After a capture, the pawn moves
ahead on its new file, one square at a time. Two pawns of the same color on the same file are said to be "doubled." The only way to "un-double" them is for one of those
pawns to capture something on an adjacent file, or itself be captured by an enemy piece or pawn. Diagram 14 shows a "before" and "after" picture of a pawn capture. On the
left, diagram 14.a, we see the more advanced white b-pawn unable to advance on its own file, but able to capture (bxc4) the enemy pawn one-square ahead on the diagonal. On
the right, diagram 14.b, we see the new position of the white pawn after bxc4. White's c-pawns are now "doubled." |
 |
| Diagram 14.a Diagram 14.b |
Two additional features of pawn play, "en passant" (in passing) pawn captures and "pawn promotion," are explained next. Instruction for beginners often refers to these as "special moves," giving the false impression they are not part of the regular game, or only apply in special circumstances. Nothing could be further from the truth! En passant pawn captures and pawn promotion are defined by the Rules of Chess and are fundamental parts of the game. |
| [top] |
"En Passant" Capturing of |
When a player's pawn occupies its 5th rank, and an opponent moves a pawn two squares forward, from the second rank to the 4th rank on an adjacent file, the player with the advanced pawn has the option to capture that pawn, just as though it had only moved to the 3rd rank. The player wishing to make an "en passant" capture must do so immediately, or forfeit the option to capture that particular pawn by "en passant." A player's pawn on the 5th rank may still capture "en passant" if another adjacent pawn is moved to the 4th rank. In Diagram 15.a, we see black's pawn on its 5th rank, an adjacent white pawn on its original square. In diagram 15.b, white has exercised his option of moving the pawn two squares forward. In Diagram 15.c, we see black's pawn after it has captured the white pawn "en passant." Only pawns may be captured "en passant;" other pieces may not be captured this way. Capturing by "en passant" is optional unless it is the only way to get the king out of check. |
 |
| Diagram Diagram Diagram |
| 15.a 15.b 15.c |
| [top] |
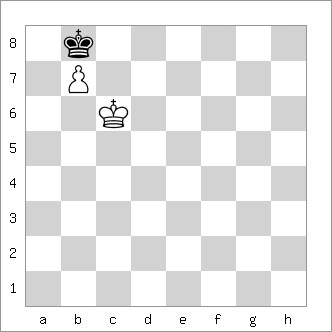
Pawn Promotion |
When a pawn reaches it's 8th rank, a player must immediately remove his pawn and replace it with the same-colored
piece of his choice (Q, R, B, or N) as part of the same move. A player may not have more than one king. The pawn may not remain a pawn. A
pawn's promotion may not be deferred. The effect of promotion is immediate; for example, if the new piece attacks (checks) the enemy king, the
king must get out of check. Because the most powerful (i.e., mobile) piece is the queen, in most cases a player will promote his pawn to a queen,
hence the incorrect but commonly-used term "queening a pawn." Theoretically, a player could promote all 8 of his pawns, thereby having 9 queens
(the original plus 8 new ones) on the board at one time. In Diagram 16.a, left panel, the white pawn on d7 has only one legal move (d8), as noted
with a white circle, after which white must promote it to another piece. In Diagram 16.b, right panel, we see the effect of pawn promotion: white
has played d8Q. |
 |
| Diagram 16.a Diagram 16.b |
| [top] |
Under-promotion | ||||
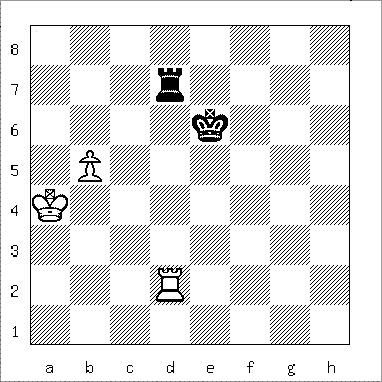
Selection of a rook, bishop or knight (instead of a queen) is called "under-promotion". The value of under-promotion is where the new piece, often a knight, will enable an otherwise stalled attack to continue, will effect checkmate more quickly than a queen or perhaps because promotion to a queen would create a stalemate. | ||||
In Diagram 17, it's White's turn to move and he has a passed pawn on the 7th rank. If he "queens" this pawn by 1. f8Q without thinking, he loses the game because black replies 1 ... Re1# and white's king is checkmated. Instead, white can under-promote the pawn to a knight (1. f8N#) and black's king is checkmated! | ||||
 | ||||
| Diagram 17. | ||||
Although opportunities for under-promotion are rare in actual play, they do occur. Equally important, when promoting a pawn players must always be alert for a stalemate condition. Examples of under-promotion follow, several from actual tournament play. The Ware-Ryan game is a "textbook example" of being careful to choose the correct piece for promotion. The Alapin-Rubinstein game is similarly instructive. | ||||
| ||||
| ||||
| ||||
| ||||
| ||||
|
| [top] |
Castling |
The main purpose of castling is protection of the king. In the opening phase of a game, a king in the center of the board may be vulnerable to
attack due to movement and exchange of some of the pawns, opening lines of attack. After castling, the king is again shielded by a wall of pawns. A secondary purpose of
castling is to connect the two rooks for mutual support. In order to castle, all the following conditions must be met: |
Castling is a maneuver in which the king and a rook are both moved; although two pieces are involved, the maneuver counts as one move or turn. Each side may castle only once during a game. Castling may be done to either side of the board and is commonly referred to as "king-side castling" or "queen-side castling," referring to the initial position. Castling is done correctly by moving the king first, two squares to the left or right, then placing the rook next to the king on the opposite side. For the reason behind always moving the king first, see "touch move rule." Diagram 18 shows both sides ready to castle. Diagram 19 shows both white and black after castling king-side; there is one empty square between the kings and the edge of the board. Diagram 20 shows both white and black after castling queen-side; there are two empty squares between the kings and the edge of the board. Diagram 21 shows white castled king-side, black castled queen-side. This is known as "opposite wing castling" and usually signals a "sharp" (highly tactical) game where both sides advance the wing pawns away from their own king, attempting to open files to the enemy's castled king. |
 |
| Diagram 18. |
 |
| Diagram 19. |
 |
| Diagram 20. |
 |
| Diagram 21. |
Novice players are sometimes confused about the legality of castling. In Diagram 22.a, black to move, white is threatening Nxc7+, forking King
and Rook. Black would like to defend his pawn by castling queen-side. Is castling in this position permitted by the rules? Diagram 22.b shows the position after 1. ...
0-0-0; now the King protects the c-pawn. Note: the square b8 was attacked by white's knight, but only the Rook crossed this square. Black's King did not move into check
during the castling maneuver, therefore 1. ... 0-0-0 is a legal move (per condition 4. above.) |
 |
| Diagram 22.a |
 |
| Diagram 22.b |
In Diagram 23.a below, white to move, black is threatening ... Rxh1+ followed by ... Rxb1, winning two pieces. White cannot castle queen-side,
which would connect the Rooks, because the white knight sits on b1; all the squares between King and Rook must be empty in order to castle to that side, per
condition 5 above. However, white may castle king-side. Even though the Rook at h1 is under attack, the white King will not move into check during the castling maneuver.
Diagram 23.b shows the position after 1. 0-0. |
 |
| Diagram 23.a |
 |
| Diagram 23.b |
| [top] |
The Three Phases |
The opening is the first few moves of a chess game, characterized by the fight for control of the center and completion of development: moving as few pawns as possible in order to get minor pieces off the back rank and onto good squares and getting the king castled. Over the centuries, distinct patterns of pawn formations and piece deployments have acquired commonly accepted names. There are no standardized names for some openings; what they are called depends upon the nationality of the annotator or author. Some variations are named after their supposed originators, others for the players who popularized the lines, and still others for the tournament sites where they were first played. Today such claims and disputes over which name is proper have been relegated to chess historians. Collections of chess games in PGN (Portable Game Notation) are indexed by NIC (New In Chess), Chess Informant (Savovski Informator) or ECO (Encyclopedia of Chess Openings) codes rather than traditional names. Collections of best Master games and analyses for each opening variation constitute opening theory. Chess opening theory is still published in traditional print media but is equally likely to be distributed on cd's or dvd's, downloadable databases and internet web sites and blogs. Opening play that follows published theory is called a book opening, and a grand variation may run 15-20 moves deep, well into what is normally considered the middle game. A new move, or an old move resurrected by analysis is called a TN (theoretical novelty.) Whether a TN is merged into mainline theory, or relegated to a footnote, depends upon what success it enjoys among top players. Staying au courant is a large part of an active player's tournament preparations, as opening theory is in a constant state of flux. |
The middle game occurs when development has been completed, or nearly so, and opposing forces are joined in battle. It is characterized by attack, defense and maneuvering as both sides try to further their own plans while resisting those of the opponent. Middle game play may consist of quiet maneuvering or violent tactics, and usually features involvement of the heavy pieces (queen and rooks.) Combinations and mating attacks most often occur in the middle game. Players must learn how to analyze a position accurately. Careful assessment of the five basic elements (force, space, time, pawn structure and king safety) will enable a player to develop a plan that is appropriate for the position at hand. But chess is dynamic; every move alters the previous position, even if only slightly. Above all, a player must be flexible, willing to revise or even discard a prior plan in favor of a new strategy. |
An endgame usually presents a somewhat simplified position, with fewer pieces and pawns due to exchanges in the opening and middle game. The kings become active pieces, especially in positions without queens, where there is less danger of a mating attack. Endgames also have strategy and tactics; pawn promotion is the objective of some endgames, while direct assault on the enemy king is featured in others. Many endgame positions are recurring and have their own published theory, making them amenable to study and to extraction of principles which may be applied to future, similar positions. To make any kind of meaningful progress in chess, a player must expand his knowledge of endgames. |
| [top] |
Values of the Chessmen |
The basis for determining the value of the chessmen is their relative mobility or power. The more squares a piece can reach, the greater its
mobility. Giving the pawn a value of "1" leads to the following traditional chart of relative values: |
| queen | 9 points | |
| rook | 5 points | |
| king | 4.5 points * | |
| bishop | 3 points | |
| knight | 3 points | |
| pawn | 1 point |
* Obviously the king is never captured or exchanged and has infinite value: if the king is lost (check mated) the game is over! The 4.5 figure is a king's estimated mobility value in simplified end games. | ||||||
The chart above has universal appeal because it's not complicated and is easily remembered. However, many famous players (including several world champions) have proposed slightly different "weightings" of the pieces, including Staunton, von Bilguer, Lasker, Evans, Fischer, Kauffman, Euwe, Berliner and others, not to mention chess engine evaluations which deal in "centipawns" (1/100's of a pawn.) Novice players should realize it is a table of "relative" values - a guide to exchanging. | ||||||
When a piece (other than a King) or pawn is threatened with capture, a player must decide whether to capture the attacker, retreat, or defend
that unit in place. In general, when a piece is attacked by one of lesser value, defending is not an option and the higher-value piece must retreat to a
safe square. Defending an attacked piece with one of less value than the attacker is the most efficient defense. In Diagram 24, white's knight on e5 is attacked twice
(black's rook and queen both threaten to capture the knight.) In Diagram 25, white has defended his knight by advancing the f-pawn two squares. Even though the knight is
attacked twice and defended only once, black dare not capture the knight with either piece because he will lose a rook (5 points) or a queen (9 points) for a knight (3
points) and a pawn (1 point.) | ||||||
 | ||||||
| Diagram 24. | ||||||
 | ||||||
| Diagram 25. | ||||||
Obtaining three pawns for a minor piece (a bishop or a knight) is said to be an "even" exchange. The exchange of bishop for knight, or knight for bishop, is considered an "even" exchange, although some charts list the bishop at 3.5 points. The bishop has greater mobility than the knight on an open board, but can only reach the 32 squares of its own color. The knight can reach all the squares on the board, albeit slowly. A knight will be more valuable in closed positions, especially vs. a "bad bishop" blocked behind its own pawns. | ||||||
The bishop pair is almost always considered a positional advantage versus any other combination of minor pieces, so perhaps the bishop should rate slightly higher. Pundits frequently refer to obtaining bishop for knight as winning "the minor exchange." Two minor pieces for rook and pawn is an even exchange, theoretically. When one player obtains a rook for a minor piece, he is said to win "the exchange." Exchanging queen and pawn for two rooks is often difficult to evaluate. Exchanging a queen for three minor pieces is also difficult to assess. While "rules of thumb" are helpful guides, there are always exceptions and a player must evaluate each potential new position carefully. Experience plays an important role in deciding whether to exchange. | ||||||
As we have seen in the section on how the pieces move, on an open board a queen, rook or bishop has greater "theoretical" mobility than a king, knight or pawn. But chess games are rarely played on an open board, and so actual mobility of all the pieces must be constantly re-evaluated during a game. | ||||||
Actual mobility of any piece is, of course, greatly influenced by the presence of other pieces and pawns on the board, particularly the latter. In the opening, the pieces have very little mobility. In the middle game, after pawn moves, piece deployment and exchanges, the board becomes less crowded and mobility of the remaining forces increases. In the ending, the few pieces and pawns remaining attain near-maximum mobility. | ||||||
Theory of Exchanging |
The concept of force (material) is fundamental to understanding chess; with very few exceptions, superior force wins. It is therefore vital that players not drop or hang (lose) material, or sacrifice material without obtaining sufficient compensation. If a player obtains only one or two pawns for his minor piece, he needs to gain positional (non-material) compensation such as better development, control of key squares or the initiative (accumulated threats which limit an opponent's choice of replies.) This is the idea behind opening gambits and positional sacrifices, voluntary surrender of some material (usually a pawn, sometimes a whole piece) to obtain other compensation. Ultimately, compensation must yield at least recovery of the sacrificed material, successful attack on the king or a won ending. If the balance of material cannot be restored, or checkmate given, then the player down in material faces an uphill struggle, most likely a lost ending. |
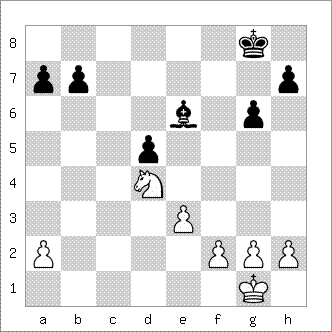
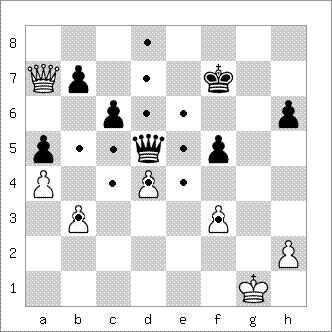
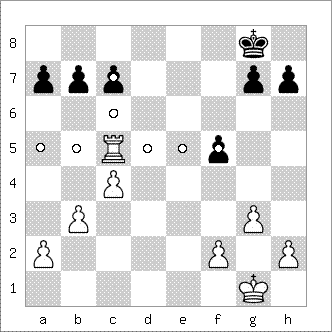
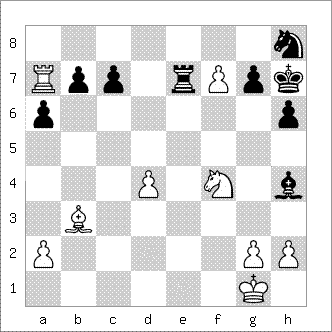
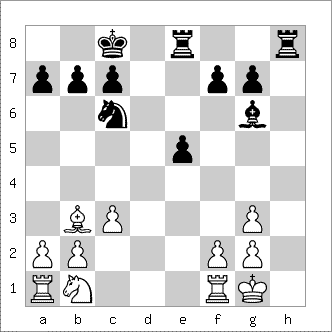
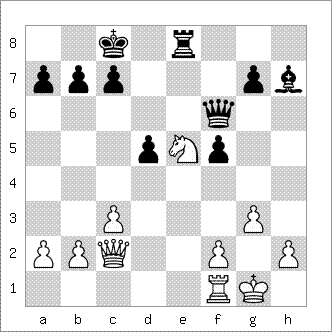
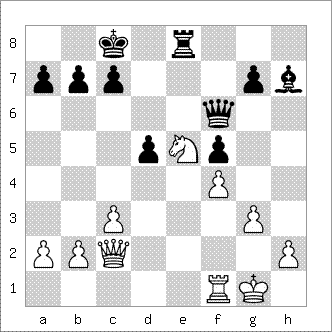
Our sample game, played by correspondence, illustrates these points very well (see "Chess Notation" above). Black offers a pawn with 8 ... d5, the famous Marshall (Counter) Attack in the Ruy Lopez opening, ECO code C89. As compensation, |
Black obtains a lead in development, control of the center and, most important of all, a strong initiative due to multiple threats by mobile pieces bearing down on white's king position. It comes as no surprise that Black is able to strip away the White king's defenders, sacrificing a bishop for two pawns (16 ... Bxg3) which quickly leads to checkmate. In the final position, notice White's queen-side pieces, still on their original squares, helpless spectators. This is what can happen when time is wasted "pawn hunting" in the opening instead of first developing all one's pieces. |
Beginning chess players are often observed exchanging pieces willy-nilly ("chopping wood" in chess jargon), just to be doing something. Unless you have a material |
continued top of next column . . . |
| [top] |
| [return to homepage] |
advantage or a very favorable pawn formation (offside pawn majority, protected passer, etc.), simplifying into an endgame is most likely a bad idea. A better strategy is to evaluate the mobility of each of your pieces (and also your opponent's) in relation to the pawn structure of the position. Exchange the opponent's best positioned piece for your least-effective piece, if possible. Maneuver your worst-placed piece or pieces to better squares. Re-group - conserve your forces. | ||||||
What is a "Combination"? | ||||||
A combination is a sequence of planned moves, usually involving sacrifice, designed to attain an objective by force. The objective could be checkmate, win of material and/or improvement in one's position (as in gaining positional advantage.) Combinations can also be defensive; some of the most dramatic combinations result in a draw, thereby salvaging a badly played game by gaining a half-point instead of a loss. Purists require sacrifice to be part of the definition, preferring to label a sequence of forcing moves without sacrifice a maneuver. A combination can be anything from a simple one-two punch, to gain material or checkmate the opposing king, to complicated sequences of moves such as the next example. The following tactical gem was played by Emmanuel Lasker, five years before he became World Champion. Black has just played 14 ... Nxh5; instead of recapturing the knight with the routine 15. Qxh5, Lasker unleashes one combination followed by a second, decisive combination a few moves later. | ||||||
| ||||||
| [top] | |
What is a "Mating Attack"? | |
A mating attack is a forcing sequence of moves whose main objective is to checkmate the enemy king. Frequently the planned sequence includes sacrifice of one or more pieces. A mating attack requires precise calculation, especially where a player must wreck his pawn structure and/or sacrifice material to conduct such an attack. Sometimes a mating attack cannot achieve checkmate against the best possible defense, but the aggressor has an alternative plan that either wins material or recovers sacrificed material "with interest." A "mating net" is the driving of the enemy king to squares where checkmate can be forced against all possible defenses. | |
| Mating Attack, Example 1. | |
| PGN Viewer courtesy of ChessTempo. | |
| PGN Viewer courtesy of ChessTempo. | |
| Dravnieks - Gassin, corres 1969 | |
| [top] |
What is Position Play? |
If force is the quantitative, tactical aspect of chess, then the positional elements (king safety, space, time and
especially pawn structure) are the qualitative features of a position, the sign-posts for discovering a successful strategy. Many general treatises
on chess provide explanations of "position play," usually offering lists of "the elements" with examples from master games. One such volume is
Point Count Chess by I. A. Horowitz and Geoffrey Mott-Smith (Simon & Schuster, 1953). While not much credence is given to the authors'
"point count" (borrowed from bridge) approach, the book offers a comprehensive explanation of all the elements of position play, conveniently
summarized in one place. One can extract most of these concepts from Nimzovich's trilogy (My System, Chess Praxis and The Blockade),
but it's much easier to use the following list as a starting point, a guide for further study: |
Horowitz and Mott-Smith's |
| Plus Points |
| • Control of the center |
| • Pawn on fourth v. pawn on third |
| • Mobile pawn wing |
| • Strong outpost station |
| • Superior development |
| • Greater space |
| • Bishop-pair |
| • Bishop v. knight |
| • Half-open file |
| • Control of useful open file |
| • Rook(s) on the seventh rank |
| • Passed pawn |
| • Outside passed pawn |
| • Protected passed pawn |
| • Advanced pawn |
| • Qualitative pawn majority |
| • Advanced chain |
| • Advanced salient |
| • Better king position |
| • Offside pawn majority |
| Minus Points |
| Weak Pawns |
| • Backward pawn |
| • Doubled pawn |
| • Isolated pawn |
| • Hanging pawns |
| • Hanging phalanx |
| • Crippled majority wing |
| Weak Squares |
| • Weak-square complex |
| • Holes |
| • Compromised king-side |
| • King held in center |
| • Cramped position |
| • Bad bishop |
It is noteworthy that pawns constitute 20/32 (62.5%) of the categories, with 10 in the plus column and 10 in the minus column (four of the items under "weak squares" are really about pawn weaknesses: weak square complex, holes, weakened king's position and bad Bishop.) The pawn truly is the "soul of chess" (Philidor). No position is completely one-sided; each side will likely have some pluses and some minuses. What is needed is to understand these elements - playing "positionally" is playing to accumulate pluses and eliminate / minimize the minuses from one's position.
| [top] |
Drawn Games |
A draw is scored a 1/2-point for each player. A great deal of endgame technique involves the superior side playing to
avoid the draw, the inferior side playing to force one. There are 5 ways a game may be drawn: |
Many players claim a draw by "perpetual check," but there is no such thing in the rules. An endless series of checks will be covered by conditions (4) or (5) above. Why do we discuss drawing a chess game before winning a chess game? Because it is crucial to first understand how games are drawn. In the section on basic checkmates, the player with the advantage (in material and/or position) must know what to avoid in order to achieve a win. The player at a disadvantage (in material and/or position) must know how to maximize his chances for a draw. Ill-advised exchanges and speculative sacrifices in the opening or middle game can result in endgames that are difficult if not impossible to win. Understanding how games are drawn helps players avoid such strategic errors. |
| [top] |
Winning a Chess Game |
The one and only goal of the game is to checkmate the opposing king. It is not to capture all the opponent's pieces and pawns, as beginners are
want to do. When a king is attacked (liable to be captured on the next turn) it is said to be "in check." A player may not move his King into check, or move another piece
or pawn if such a move places his King in check. The king may not castle to get out of check (see section on "Castling".) A check cannot be ignored; the rules require a
player to get his king out of check immediately. If a king is in check and cannot escape, it is said to be "checkmated" and the game is over. Unlike other pieces or pawns,
the king is never physically captured; to win the game it is sufficient to force the enemy king into a checkmate situation. |
In addition to checkmate, a player wins the game if his opponent resigns. It is good sportsmanship to resign the game when you can calculate that your king will be checkmated, or you are so far behind in material that further resistance is futile. Among Master class players, the advantage of a single pawn is usually sufficient to force a win. Grandmaster Reuben Fine's maxim, "A rook ahead wins by force," is sufficient for amateur play. Beginners can be observed battling on in hopelessly lost positions and that is excusable, as they are learning and experience is often the best teacher. |
| [top] | ||||
The Four Basic Checkmates | ||||
Complicated (many pieces and pawns) endings can be reduced to simpler, more manageable positions. This is accomplished by purposeful exchange of pieces and pawns, the process known as simplification. Knowing when and how to simplify comes from experience and in-depth knowledge of end games. Without accumulated wisdom, advantages will be frittered away and many a winning position will deteriorate into a draw or (even worse) loss of game. | ||||
Every player must be thoroughly familiar with the following basic checkmates. These are forced wins; even with best play by the weaker side, the superior side should win. Why doesn't the weaker side resign such endings immediately? In tournament play where games are contested under strict time limits, the superior side may be short of clock time and have difficulty recalling the winning procedure, or accurately playing a lengthy sequence of moves before his flag falls. As we noted in the section on drawn games, a mistake or two and the inferior side escapes with a draw due to the 50-move rule; this is particularly true of the rarely encountered (and so infrequently practiced!) K+B+N vs. K endgame. The superior side may also blunder, losing a piece or creating a stalemate position, allowing the inferior side to escape with a draw. | ||||
K+Q vs. K. Using the opposition plus checks by the queen, the basic strategy is to drive the enemy king into a confined space, either the edge of the board or a corner, and then give a final check with the queen. Both king and queen must cooperate to effect checkmate; merely chasing the enemy king around the board with unending queen checks will result in a draw. The danger for the superior side is accidentally creating a stalemate. Great care must be exercised to always leave the enemy king two squares upon which to move, until ready to deliver the final check. An example of how to achieve this checkmate is given below: | ||||
| ||||
K+R vs. K. The same strategy used for K+Q vs K is employed in the K+R vs. K endgame. This ending generally requires more moves because a rook controls fewer squares than a queen, plus the enemy king can attack the rook directly. If the inferior side is determined to put up a lengthy resistance, hoping for a draw under the 50-move rule, the superior side must remember to "lose" a tempo (move) to gain the opposition. A small mistake or two by the superior side can normally be tolerated, with checkmate still possible within the 50-move rule. Of course the superior side must guard against creating a stalemate position. The techniques are demonstrated below: | ||||
| ||||
K + 2B's vs. K. This checkmate is almost as easy as K+Q vs. K. Placed on adjacent squares, the two bishops create a barrier the enemy king cannot cross. It is a simple process to drive the king to the edge of the board (taking care to leave the king at least two squares,) bring up the king to establish the opposition and then give the final checks with the bishops. The techniques are demonstrated below: | ||||
| ||||
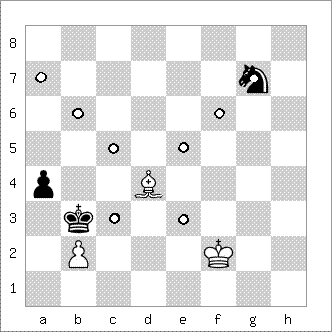
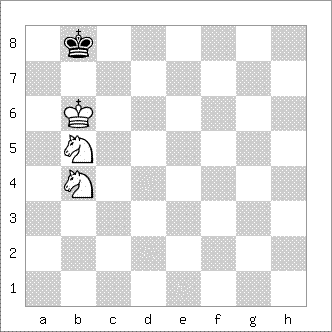
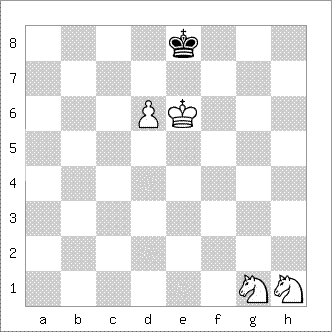
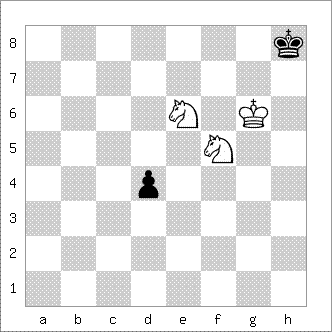
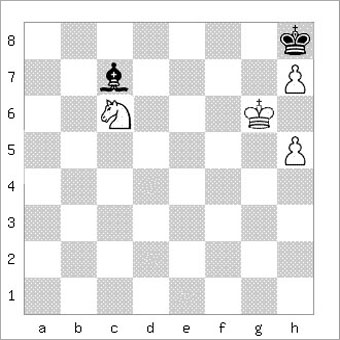
K+B+N vs. K. This endgame has the reputation of being very difficult. It is certainly more complex because the superior side must coordinate three pieces to drive the enemy king and the process is lengthy, meaning the superior side cannot make many errors and stay within the 50-move limitation. Checkmate can only be forced on a corner square of the same color that the bishop controls, or on a square adjacent to that corner square; checkmate can be given by the bishop or the knight. The checkmate process consists of two phases: step one is to drive the enemy king to an edge of the board, step two is forcing the king into the desired corner. The player on the defensive will strive to keep his king in the middle of the board or, failing that, move his king to the wrong-colored corner square. Besides the 50-move rule, the inferior side also has two other drawing possibilities, stalemate and capture of one of the pieces, resulting in insufficient mating material. | ||||
Several strategies have been described to assist players with this checkmate. Interested players may search the internet for the "W" method, which describes the pattern of the knight's movements, and Daniel Deletang's "triangles," entrapping the king in successively smaller triangular areas of squares. The following example involves a "W" pattern (Nf7-e5-d7-c5). | ||||
| ||||
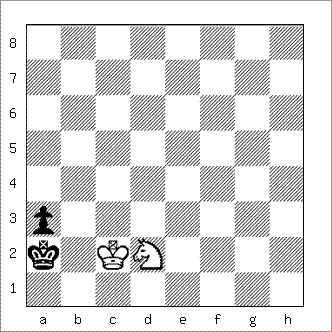
Note: K+2N's vs. K is a draw. Although two knights can checkmate, they cannot do so by force; the defender has to make a mistake: starting with Diagram 26, 1. Nc6+ Ka8??? (1... Kc8! and the king escapes) 2. Nc7#. | ||||
 | ||||
| Diagram 26. | ||||
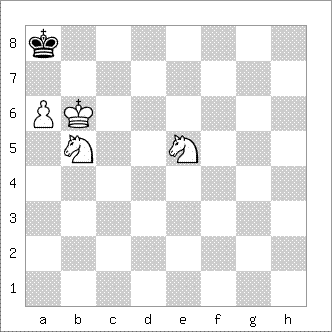
Many authors point out that K+2N's+P vs. K is a forced win, as the extra unit enables the superior side to gain a critical tempo. Indeed, the win is trivial with any pawn except an a- or h-pawn, which requires a particular technique (see explanation for Diagram 29 below). In Diagram 27, white only needs one of the knights (any extra piece or pawn would do!) to gain a tempo and the ending transposes to K+Q vs. K: 1.d7+ Kd8 2. Nf3! (not 2. Kd6??? stalemate) Kc7 3.Ke7 Kc6 4.d8=Q and it's mate-in-five (4... Kc5 5. Qd4+ Kb5 6. Kd6 Ka6 7.Qb4 Ka7 8. Kc6 Ka6 [or 8... Ka8 9.Qb7#] 9.Qa4#.) | ||||
 | ||||
| Diagram 27. | ||||
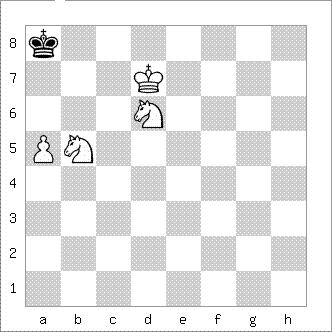
In the case of the a- or h-pawn, white's king cannot get control of the promotion square as in the previous example. Instead, the superior side must advance the pawn to the 6th rank and then use the knights to drive the enemy king away from the corner. | ||||
 | ||||
| Diagram 28. | ||||
From Diagram 28 above, White wins by 1. Nc7+ Kb8 2. a7+ (or 2. Nc6+ Kc8 3. a7 Kd7 4. a8=Q Kd6 5. Qd8#) Kc8 3. a8=Q#. The two knights do not force checkmate. The extra pawn wins because it actually becomes a queen. | ||||
 | ||||
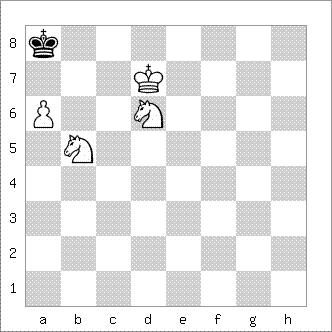
| Diagram 29. | ||||
However, in Diagram 29, White can utilize the extra tempo to mate with the two knights: 1... Kb8 2.a6 Ka8 3.Nc8 Kb8 4.Nd4 Ka8 5.Kd8 Kb8 6.Nc6+ Ka8 7.Nb6#. | ||||
 | ||||
| Diagram 30. | ||||
In Diagram 30, White can administer checkmate with the pawn: 1.Kc6 Kb8 2.Kb6 Ka8 3.Nc7+ Kb8 4.a7#. | ||||
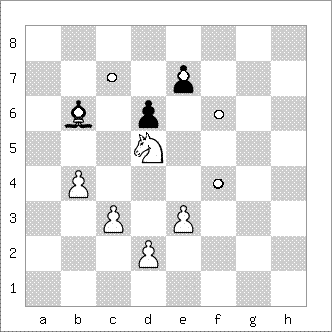
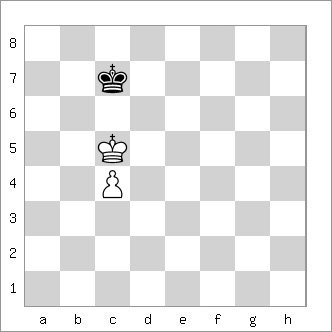
A much more interesting endgame is where the inferior side possesses the pawn; this is essentially a K+2N's vs. K+P ending. | ||||
 | ||||
| Diagram 31. | ||||
Diagram 31 is a trivial example but it shows the
basic idea: White will immobilize the Black king on purpose, forcing Black to make meaningless pawn moves while the second knight maneuvers to a checkmating
square: 1. Ne7! (if either knight captures the d4 pawn, we have the same situation as Diagram 26 = draw) d3 2. Ng5 (or 2. Nd8) d2 3. Nf7#. There is an
incredible amount of theory for this endgame; whether or not the two knights can win depends on the particular square which the pawn occupies, whether it can be
blockaded by a knight and, when the blockade is released, whether that knight can give checkmate before the pawn reaches the 8th rank, promotes to a queen and starts
giving checks. Interested students can research the "Troitsky position" in advanced endgame manuals or on the internet.
|
| [top] |
The Basic "King and pawn vs. King" Ending |
Underpromotion to Rook rarely if ever figures into the strategy of the basic K+P vs. K endgame. Examples in this section will assume the objective is to "queen" the passed pawn. For composed positions, we will also adhere to the convention of using White as the superior (has an extra pawn) side, Black as the inferior or defending side. Positions taken from actual tournament games are identified as such. |
| [top] |
Counting and Pawn Promotion |
In simplified positions players often count up the number of moves required to promote a passed pawn, the number of moves the opposing King needs to intercept the pawn, and compare the difference to determine who will succeed. Simple enough when only a few moves are involved, but it's easy to make a mistake if a large number of squares must be traversed, especially if the King has several paths it can take. The following section describes a better way. |
| [top] |
Rule of the Square |
It is usually stated the "rule of the square" only applies to King and pawn endings. True enough, but the concept also has value for deciding where, and when, to simplify into a K+P endgame. For example, if the calculation is not in your favor, the next step might be to look for a way to reverse that. Perhaps some zwischenzug, check or series of checks can force the enemy king away from "the square." Then, after pieces are exchanged, the opponent has a lost ending. Such calculations are easier, and less prone to error, when you have determined "the square" beforehand. |
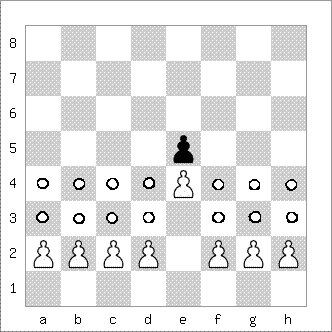
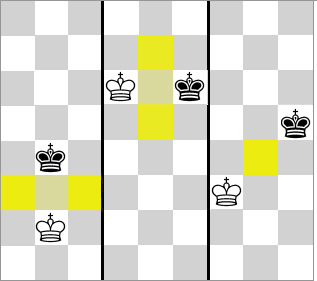
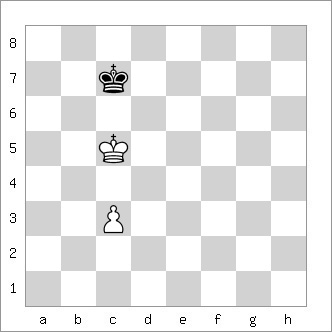
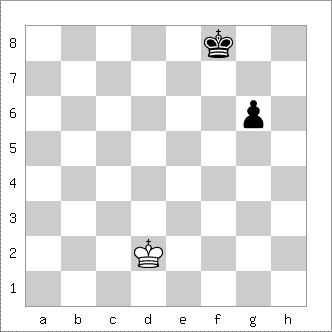
In Diagram 32. below, the target is the promotion square (b8.) "The square" is a hypothetical square defined
by the number of squares the pawn must travel to reach the promotion square (be sure to include the square the pawn occupies now and the target
square) and the same number of squares across the board toward the enemy King. In this example it is the 5x5 "square" outlined in red. The rule
states: if black's King is in "the square" or, if it's black's turn to move and his King can enter "the square," then it can catch the pawn and
prevent it from promoting. If the black King cannot enter the "square" on its next move, the pawn will be promoted. Here, having the move the black
King can enter "the square" and the game will be drawn if white tries to advance his pawn unaided. As our final example (Diagram 45) will show,
however, it seems every rule has an exception. |
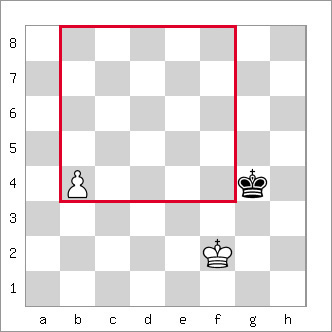 |
| Diagram 32. Black to move |
 |
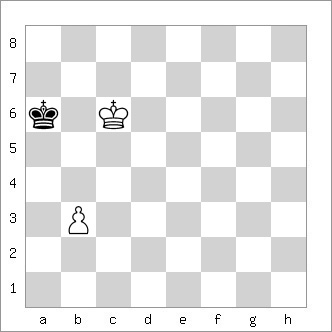
| Diagram 33. Black to move |
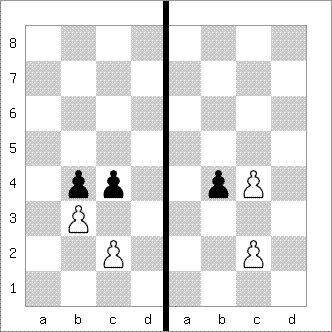
In Diagram 33, 1... Ke8 (or 1... Ke7) and black's King has moved inside "the (4x4) square." So white's King must escort the pawn. But now the issue of "key squares" looms large. As will be explained in the next section, for a white pawn on b5, the six key squares are denoted by white circles. 2. Kd5 Kd7 (black has the opposition, but ...) 3. b6! (and black must yield control of the key square c6) Kd8 (or 3... Kc8 4. Kc6! transposes) 4.Kd6! (white takes the opposition, not 4. Kc6? Kc8 5. b7+ Kb8 draw) Kc8 5.Kc6 Kb8 6.b7 (zugzwang) Ka7 7.Kc7 Ka6 8.b8Q wins. |
| [top] |
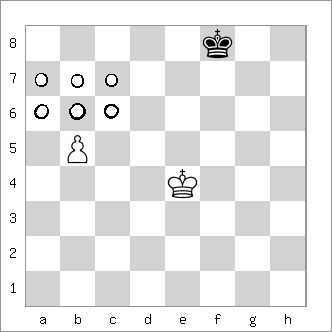
Key Squares |
For white b,c,d,e,f or g-pawns on their 2nd, 3rd or 4th ranks, the key squares will be the three adjacent squares two
ranks directly ahead of the pawn. For white pawns on their 5th or 6th ranks, the number of key squares doubles to include the three adjacent squares immediately
in front of the pawn, plus the three adjacent squares two ranks in front of the pawn. And for a white pawn on its 7th rank, key squares are the five squares adjacent
to the pawn: the two squares beside and the three squares directly in front of the pawn. |
If a King can occupy any one of the key squares and retain the opposition, the pawn will queen no matter
what moves the defender plays! When a passed pawn is escorted by a king, having the opposition is crucial to gaining control of a key square. For
the defending King, it's not enough to get in front of the passed pawn. The defending King also needs the opposition in order to draw. Note: it is
the king, not the pawn, which must occupy a key square. In order to do this, the King must lead the way, not follow behind. If the defending King
is blocking the pawn and the other King is following its pawn, a draw will result. |
 |
| Diagram 34. |
In Diagram 34, as we saw in our previous example, the winning move is b6!, denying Black's king access to key square c7. But suppose White plays something else, such as 1. Kc5? There will follow 1 ... Kc7 (black keeps the opposition and prevents White from getting his King in front of the pawn) 2. b6+ (after any King move, black plays ... Kb6) Kb7 3. Kb5 Kb8! (the king must move straight back - any other move loses, for example 3 ... Kc8 4. Kc6 Kb8 5. b7 zugzwang) 4. Kc6 (or 4. Ka6 Ka8 5. b7+ Kb8 6. Kb6 stalemate) Kc8 5. b7+ Kb8 6. Kb6 stalemate. Key squares aside, the superior side must still play accurately to nail down the win. |
Let's see how young Bobby Fischer handled this type of ending; Fischer-Bisguier, U.S. Championship 1958. In Diagram 35, GM Arthur Bisguier has just played
81... Rd7, offering to trade Rooks, apparently believing the simple K+P ending is drawn. |
 |
| Diagram 35. |
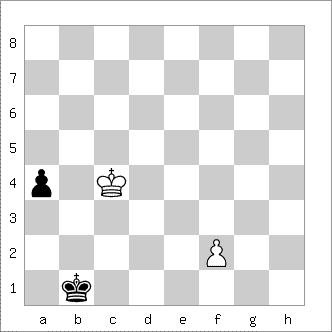
82. Rxd7! Kxd7 83. Ka5! For an interior pawn on the 5th
rank, key squares are a6, a7, b6, b7, c6 and c7. White must not allow Black's king to reach the b7 square. 83... Kc7. |
Rook pawns (pawns on the a- or h-files) have their own version of key squares. The key squares are b1 and b2 for black's a-pawn, b7
and b8 for white's a-pawn. Key squares are g1 and g2 for black's h-pawn, g7 and g8 for white's h-pawn. In Diagram 36, Seirawan-Alburt, Berkeley 1984, the key squares are b1
and b2 (marked by black circles). |
 |
| Diagram 36. Position after 67 ... Kxe5 |
The game continued 68. Kf3, entering "the square" and easily catching the lone pawn if advanced. 68 ... Kd4! Black seizes the "knight opposition" (keeping a knight's move between Kings) which he can maintain all the way across the board, and white resigned. If 69. Ke2 Kc3 70. Kd1 Kb2. Black's King occupies a key square and the black pawn cannot be stopped. |
| [top] |
The Defender's King |
It seems every "rule" has an exception. Here's the one for key squares. |
 |
| Diagram 37. Position after 85 ... Kg8 |
Diagram 37. is Golombek-Pomar, London 1946. Play continued: 86. Kh6! (not 86. Kf6, Kh8 87. g6? the (dreaded) exception to the
rule: white Knight pawn on the 6th rank and black's King in the corner. If the white King occupies a square adjacent to the pawn on the 7th or 8th rank and black has the
move, the position is a stalemate.) 86 ... Kh8 87. g6 Kg8 88. g7 Kf7 89. Kh7 1-0. Rather than trying to memorize such exceptions, a disciplined player always looks for
stalemate situations before making a move. Developing such habits will avoid this and similar pitfalls. |
 |
| Diagram 38. Position after 60. Kh3 |
Diagram 38. leads to the same situation with colors reversed. Maroczy-Marshall, Monte Carlo 1903, continued 60. ... g4+ 61. Kh2 Kf2 62. Kh1 Kg3! (not ... g3? stalemate) and white resigned due to 63.Kg1 Kh3 64. Kh1 g3 65. Kg1 g2 zugzwang 66. Kf2 Kh2 etc. and the pawn queens. |
| [top] |
The Opposition |
The opposition is a key element in winning vs. drawing King and pawn endings. And, of course, the opposition
is the key to the basic checkmates. A novice player simply must understand opposition: what it is, how to determine who has it, how it can be gained or
lost, and especially what can be achieved by it. The opposition is not an end in itself, but the means to an end: penetrating the position with
the King, seizing more space (especially key squares) and ultimately forcing the opposing King to abandon (zugzwang!) its blockade of the
passed pawn. |
 |
| 39a. 39b. 39c. |
When only one square separates them, two Kings are said to be in direct opposition. Diagram 39a. shows direct opposition on a file, 39b. is direct opposition on a
rank and 39c. is diagonal (direct) opposition. The yellow squares form a "no man's land" which neither King may occupy. The side which does NOT have the move holds the
opposition; the side on the move cannot advance toward the enemy King and must give way. Note: in 39a and 39b, the King who has the opposition will be able to occupy at
least one of those yellow squares after the opponent moves his King. Diagonal opposition (39c) may not result in such an immediate gain, but eventually will resolve into one
of the other two types. At the very least, diagonal opposition forces the opposing King to take "the long way 'round" while trying to reach an
objective. |
 |
| 40a. 40b. |
Diagram 40a. demonstrates distant opposition. If two Kings oppose each other on the same line (file, rank or diagonal) at a distance, we determine
who will hold the opposition by counting the squares between them. If an odd number (1, 3 or 5), the side which does NOT have the move will hold the opposition as the two
Kings approach each other. If an even number of squares (2, 4 or 6) separates them, the side whose turn it is to move will hold the opposition. That's pretty straightforward,
but what if the Kings are far apart and not aligned for easy counting? |
| [top] |
"Zugzwang" |
Zugswang is a German chess term meaning "compulsion to move." A player is in zugzwang when his
position cannot be improved, but he is compelled by the rules of the game to take his turn. A player in zugzwang must make a move that
weakens his position and/or loses the game. |
 |
| Diagram 41. |
Diagram 41. above is a classic zugzwang endgame position. If white has the move, the game is drawn, either 1. Kb6 stalemate, or 1. K-any other legal move
and there follows 1... Kxb7, draw due to insufficient checkmating material. If Black has the move then he is in zugzwang and must play 1 ... Ka7 and there follows
2. Kc7 Ka6 and mate in three: 3. b8Q Ka5 4. Qb3 Ka6 5. Qb6#. |
 |
| Diagram 42. |
Diagram 42. is another example. Key squares for the c4-pawn are b6, c6 and d6. If white has the move he can make no progress. Black will take the direct opposition no matter where white moves his king and the position will be drawn by repetition. Or (after 1. Kd5 Kd7) White can push his pawn: 2. c5 Kc7 3. c6 Kc8 4. Kd6 Kd8 5. c7+ Kc8 and we've reached a drawn position. However, with Black to move in Diagram 41, White has the opposition and wins: 1 ... Kb7 2. Kd6 (or 1 ... Kd7 2. Kb6 etc.) Kc8 (2 ... Kb8? 3. Kd7!) 3. Kc6! Kb8 4. Kd7 White controls the queening square c8 and the pawn cannot be stopped. |
| [top] |
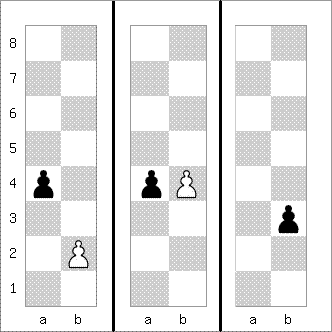
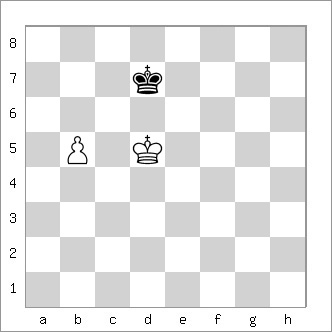
Triangulation and the Reserved Tempo |
When we speak of triangulation, people immediately think of a King maneuvering on three adjacent squares that
form a "triangle," while the opposing King can only move "back and forth" on two squares. Thus, the king with three squares is able to gain the
opposition, reaching the identical position but with the opposing King now forced to move. Indeed, we saw the white King triangulate to seize a key
square in the solution to Diagram 33. above: Kd5-Kd6-Kc6 (moving directly to c6 would result in a draw.) A pawn move that forces the opponent's King
into zugzwang will gain the opposition, too. Now "triangulation" doesn't describe the forward movement of a pawn, so we refer to such a move as a
reserved tempo (a move in reserve.) In a basic K+P vs. K ending, "losing a move" can be accomplished by the King or the pawn! Some examples follow:
|
 |
| Diagram 43. White to move |
Diagram 43 above, White to move. White can make no progress with King moves because Black holds direct
opposition. So white must play 1. c4!, "losing a move" and now black is in "zugzwang" because white has gained the opposition. The winning
process should be quite familiar by now: if 1 ... Kb7 2. Kd6 (or 1 ... Kd7 2. Kb6 etc.) Kc8 (2 ... Kb8? 3. Kd7!) 3. Kc6! Kb8 4. Kd7 White controls
the queening square c8 and the pawn cannot be stopped. Diagram 42. is also an example of why leading with the King (and not the pawn) is the correct
procedure. By not pushing a passed pawn too soon, the superior side has one, sometimes two "extra" moves stored up. Reserved tempi are like money in
the bank ... spend them only when you need to. |
 |
| Diagram 44. Position after 65 ... Ka6 |
Diagram 44 is Botvinnik-Flohr, Moscow 1944. King moves are futile because black holds direct
opposition. There followed 66.b4! Ka7 67.b5! Kb8 (if ... Ka8 68. Kc7 Ka7 69. b6+ Ka8 70. b7+ and queens next move) 68.Kb6, gaining the opposition
and black resigned due to 68 ... Kc8 69. Ka7 (or ... Ka8 69. Kc7) Kc7 70. b6+ and the pawn advances to b8. |
 |
| Diagram 45. White to move |
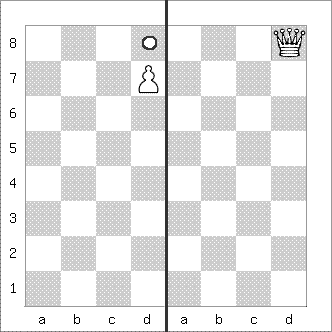
In Diagram 45. above, Black has just played ... Bc7, preventing Nd8 or Ne5 after which Nf7+ is an unavoidable smothered mate. But White has a reserved tempo; the winning move is h6! and now Black is in zugzwang - he must move his Bishop and give-up control of d8 or e5. |
 |
| Diagram 46. White to move |
In Diagram 46. we have K + N vs K + RP. White holds the opposition; his task is to force Black to
"burn" his final reserve tempo, instead of moving his King back and forth on the a-file to obtain a draw. But the pawn is no match for the
mobile knight, which can gain / lose a tempo at will. White wins by 1. Nf3 Ka1 2. Nd4 Ka2 3. Ne2 Ka1 4. Nc1 (zugzwang!) a2 5. Nb3#. |
| [top] |
Out-flanking |
 |
| Diagram 47. Black to move |
In Diagram 47, black has the move. White's King is well within "the square" and so black's King must support the g-pawn's advance. The key squares are f4, g4 and h4. Black only needs to occupy one of them to make progress. If 1... Kf7? 2. Ke3 Kf6 3. Kf4! draw. However, after 1. ... Kg7!, the black King is two files closer to the key square h4 than is white's King. 2. Ke3 Kh6 3. Kf4(or 3. Kf3) Kh5! black's King has out-flanked his opponent's King. 4. Kg3 (4. Kf3 Kh4 5. Kg2 Kg4 6. Kh2 Kf3 7. Kh1 Kg3 8. Kg1 g5 9. Kh1 Kf2 10. Kh2 g4 11. Kh1 Kg3 12. Kg1 Kh3 13. Kh1 g3 14. Kg1 g2 15. Kf2 Kh2 16. Kf3 g1Q) Kg5 5. Kg2 Kg4 6. Kg1(6. Kh2 Kf3 7. Kh1 g5 8. Kg1 g4 9. Kh2 Kf2 10. Kh1 Kg3 11. Kg1 Kh3 12. Kh1 g3 13. Kg1 g2 14. Kf2 Kh2 15. Kf3 g1Q) Kg3 7. Kh1 g5 8. Kg1 g4 9. Kh1 (9. Kf1 Kh2 10. Kf2 g3+ 11. Ke3 g2 12. Ke4 g1Q) Kf2 10. Kh2 g3+ 11. Kh1 (11. Kh3 g2 12. Kg4 g1Q+) g2+ 12. Kh2 g1=Q+ 13. Kh3 Qg3#. |
The final example is not technically K+P vs K, but it further illustrates the idea of out-flanking in a typical "king and pawn" endgame. Richard Réti
published an endgame study in 1921, demonstrating how a lone king, hopelessly out of "the square," nevertheless can get into "the square" by making
threats which gain tempi (moves) for the defender. This technique became known as the "Réti Maneuver," and is another form of out-flanking.
|
 |
| Diagram 48. Position after 59 ... Kxb1 |
Diagram 48. is Yates-Marshall, Karlsbad 1929. Marshall utilizes Reti's theme in an actual tournament game. White would like to play 60. f4, as black obviously cannot catch the pawn. But black has a powerful counter-threat, a passed pawn much closer to the a1 square than white's pawn is to f8. Play continued 60.Kb4 (forced) Kb2! (not 60. ... Kc2? 61. f4 wins. The text threatens ... a3 and black's pawn, now protected, will queen first.) 61.Kxa4 (forced) Kc3 62.f4 Kd4! and Black's King is inside "the square." The white King has been out-flanked and cannot come to the aid of its pawn. Here a draw was agreed. |
| [top] |
Six Rules for the Basic |
1. Lead (do not follow) the passed pawn with the King. A corollary is do not get in a hurry to push the pawn; instead, play to get the King in
front of the passer where it can fight for the opposition. Another corollary: if the weaker side can maintain the opposition, preventing the opposing
king from getting in front of its pawn, the game will be drawn. |
| [top] |
Suggestions for |
We have briefly mentioned the opening, middle game, endgame and, of course, basic checkmates. Although we divide a chess game into these arbitrary phases for convenience of study, a chess game is an integrated whole. One cannot play the opening without regard for the middle game to follow, and similarly, what will transpire in the ending is greatly influenced by preceding middle game play. Unfortunately, novice players often rush to study tricks and traps in the openings, or else concentrate on middle game tactics, combinations, and mating attacks. Among players of equal skill, games are rarely decided in the opening or middle game. It is in the endgame that advantages accumulated during opening or middle game play are either brought to fruition or neutralized. John W. Collins, an American master who mentored young Bobby Fischer and co-authored an edition of Modern Chess Openings, called the endgame the North Star for opening and middle game play. Endgames should be studied first; after proficiency with the basic checkmates, master the basic King + pawn vs. King endgame . Next, begin a systematic study of pawn endings followed by rook and pawn endings (we have given introductory explanations of two well-known K+R+P vs K+R endings, the Lucena and the Philidor positions, in the glossary.) After that, study endgames involving various combinations of queens, rooks, and minor pieces, with and without pawns. Next tackle middle game theory, especially analysis of position, as this is what tells a player when to attack, when to defend or when to transition into a favorable endgame. Tactics training, developing an "eye" for mating attacks and combinations, can be started any time and should be a daily activity for active players. |
Finally comes the in-depth study of opening theory (to develop one's opening repertoire) and playing through master games. This last phase will remain an ongoing process throughout a player's career! |
 |
Chess is inexhaustible; the more we learn, the more we realize how little we know of its secrets. The ancient Hindu proverb sums it up nicely: "Chess is a sea in which a gnat may drink and an elephant bathe." |
| [top] |
| [return to homepage] |