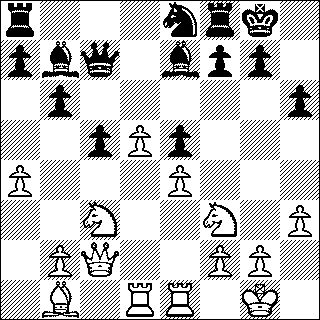
Since Black has been unable to play e5, he should at least prevent his opponent's e4. Necessary was 8 ... Ne4. (The text cannot be sound.
Black commits the cardinal sins of opening play, i.e., moving the same piece twice, decentralization of a piece, neglecting development of the other pieces,
etc. Black is not desperate to play ... e5 in the Leningrad as both bishops already have good diagonals, but Black ought to do something about the QN. 8 ...
Nbd7 was worth consideration, to meet e4 with ... e5. If White plays d5, the opening transposes to a King's Indian Defense where Black has the ready-made
pawn exchanges at ... c6 and ... f5, to open lines, already in place. If White plays dxe5, then ... dxe5 and Black controls more center squares. Another
possibility was 8 ... Na6 - c7. — WCL.)
9 ... fxe4 is preferable, even though it gives White the edge.
| 10. |
e5 |
fxg3 |
| 11. |
fxg3 |
Bg4 |
| 12. |
e6 |
... |
White has taken full advantage of Black's neglect of the center.
| 12. |
... |
Bxf3 |
| 13. |
Bxf3 |
Bxd4+ |
| 14. |
Qxd4 |
Rxf3 |
Black has won a pawn at the cost of a lost game. The absence of his dark-square bishop, in addition to White's pawn at e6, gives White an
unshakeable positional bind. (All this chess talk was a little over my head back then. However, I was aware that I was well ahead in development, as Black had
exchanged his active pieces and failed to develop his queenside. I saw the tactical possibilities kingside and, if Irving was right, what follows is the best
ten-move sequence of my life. — WCL.)
White immediately exploits Black's dark-square weakness and threatens to win material with 16. Kg2. Black's next is forced.
| 15. |
... |
Qb6 |
| 16. |
Qxb6 |
axb6 |
| 17. |
Kg2 |
... |
The exchange of queens has not weakened White's attack.
| 17. |
... |
Rd3 |
| 18. |
Rf1 |
Na6 |
| 19. |
Rf7 |
... |

|
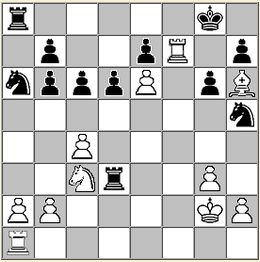
Position after 19. Rf7 ... |
(Black stumbles into a mating net. The best try for a draw was 19 ... Nf6 20. Rg7+ Kh8 21. Rxe7 Ng4 22. Bf4 Ne3+ [or ... Nc5 23. Rd1 Rxd1
24. Nxd1 Rxa2 25 Bxd6] 23. Bxe3 Rxe3 24. Rd1 Rd8 25. Rxb7 Rxe6 26. Rxb6 Nb8 27. c5 d5 28 Rxd5! but Black is two pawns down in a difficult double rook and
pawn ending. — WCL.)
(If 20 ... Ng7 [20 ... Rd2+ 21. Kg1] 21. Rxg7+ Kh8 22. Rff7 etc. — WCL.)
(Missing 21. R1xf6! exf6 22. Ne4 with mate unavoidable. — WCL.)
| 21. |
... |
Nc7 |
| 22. |
Nxf6+ |
exf6 |
| 23. |
Rg7+ |
Kh8 |
| 24. |
Rxc7 |
1-0 |
Now comes the fun. In Letters to the Editor there appeared a cook from Roy DeVault: "In studying the Loveland-Searles game in
Kandel's Kommentary, Chess Correspondent (Dec., 1978) page 178, after 17. ... Rd3 18. Rf1, Black played 18 ... Na6? allowing 19 Rf7 and lost quickly. Much
better for Black is 18 ... Nf6! After the forcing moves 19. Bg5 Kg7 20. Rae1 Na6 21. Bxf6+ exf6 we reach a key position. Now:
| (1) 22. Ne4 f5 23. Ng5 Nc7 24. a3 Rc8 |
| (2) 22. Rf2 Nc7 23. R2e2 f5 24. a3 Re8 |
| (3) 22. e7 Re8 23. Re6 f5 |
| In all three lines the fall of White's e- pawn is just a matter of time. White is already a pawn down and thus has a lost endgame. |
Rebuttal from Kandel's Kommentary:
After 17. ... Rd3 18. Rf1, Roy suggests instead of 18. ... Na6, as played in the game, 18. .. Nf6 leads to a won game for Black. Actually, White wins immediately with 19. Ne4:
| (A.) 19. ... Nxe4 20. Rf8 mate. |
| (B.) 19. ... Na6 20. Nxf6+ exf6 21. Rxf6 Nc7 22. e7 and Black will be mated on f8. |
| (C.) 19. ... N8d7 20. exd7 Nxe4 21. Rf8+ Rxf8 22. Bxf8 and White will get a new queen. |
Game 2 |
| White: Warren Loveland |
| Black: Anonymous |
| Queen's Gambit Declined (D39) |
| 1. |
d4 |
d5 |
| 2. |
c4 |
e6 |
| 3. |
Nf3 |
Nf6 |
| 4. |
Nc3 |
Bb4 |
| 5. |
Bg5 |
dxc4 |
5. ... Nbd7 is prudent. Black has surrendered the central squares to his opponent.
White's most forceful move, establishing the classic pawn center d4/e4.
A good square for the bishop in the QGD but Black could've achieved this position with a move in hand by playing 4. ... Be7 instead.
Thematic would be 6. ... c5 7. d5 (7. Bxc4, cxd4) exd5 8. exd5 0-0 9. Bxc4 Re8+
etc., or White can try 7. e5 cxd4 8. Qa4+ Nc6 9. 0-0-0 with complications.
Another good alternative was 6. ... h6, putting the question to the bishop.

|
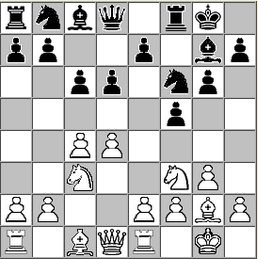
Position after 8... c6 |
Eight moves played and already Black has committed two errors. First, ... Be7 lost a tempo; Black
should maintain the pin until White expends a tempo with a3. Second, 8. ... c6 is too passive; it renders d5 unusable for either side but does nothing to
disrupt White's dominating pawn center. Marovic indicates 8. ... c5 is absolutely necessary. In terms of development, White leads Black five pieces to three
and is ahead two tempi. I'm sure a Master would consider this a won game, but then he would know what to do next. |
White is no Bobby Fischer (in my dreams!) and is not quite sure what to do next. The text was played to prevent ... Ng5 and the exchange of
dark-square bishops. I reasoned that being ahead with good attacking prospects I should keep my pieces on the board. It is not clear yet whether this bishop
will be needed in an attack on the enemy king, or perhaps posted on the h2/b8 diagonal.
Memory lapse, played in too big a hurry. Pachman recommends 10. Bh4.
| 10. |
... |
Nxf6 |
| 11. |
0-0 |
0-0 |
| 12. |
a4 |
... |
Note that Black does not have a piece or even a pawn beyond his third rank. Because White controls the center, Black's only real chance
for counterplay lies in a queenside pawn advance. I chose a4 instead of a3 for two reasons: the pawn at a4 deters queenside expansion by Black and, if Black
plays ... Bb4, threatening to exchange, I can safely bring the knight to e2, closer to the action. I have devised a plan to maneuver my bishop to b1,
threatening mate (Qh7.)
| 12. |
... |
b6 |
| 13. |
Ba2 |
Bb7 |
| 14. |
Rad1 |
Qc7 |
| 15. |
Bb1 |
Ne8 |
| 16. |
Rfe1 |
... |
If 16. e5, g6 and the dark-squared Bishop is missed. 16. d5!? looks unnecessarily risky. The text overprotects the center and White does not commit to anything yet, maintaining flexibility.

|
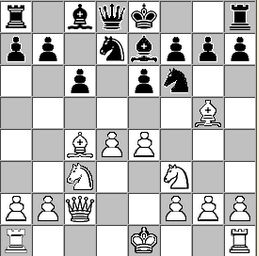
| Position after 17. ... e5 |
White needs to open lines of attack and Black naturally strives to keep the position closed. Black has finally gained a share of the center (d4, e5) but his pieces are hardly poised to exploit it. |
I considered Nxe5. I'm willing to sacrifice if I can get that diagonal open. Now if 19. ... Nxd6 20. Nxe5 unblocking the e-pawn, or if 19. ... Bxd6 20. Nxd6 Nxd6 21. Nxe5 accomplishes the same thing and Black has lost one of his king's protectors.
I still can't make Nxe5 work. The text seems good because it removes Black's knight from the kingside and opens up new possibilities for White.
| 20. |
... |
Nc7 |
| 21. |
Nc3 |
Rd8 |
| 22. |
Nd5 |
Nxd5 |
| 23. |
exd5 |
Qd6 |
The immediate 23. ... g6!? may be stronger.
If 24. ... Bxe5 25. Qh7+ Kf8 26. Qh8+ Ke7 27. Qxg7 Rxd7 28. Rxe5+ Kd8 29. Bf5 and Black is demolished.
If 25. ... Kxf7 (25. ... Qxd7 26 Qxg6+) 26. Qxg6+ Kf8 27 Qxh6+ etc.
I hope this article helps a fellow CCLA'er to gain a better understanding of what chess is all about. I know
these games are not perfect chess - I'm trying to reach class B and under players. If I get another idea down the line I'll share
it with you.
I urge more members to submit a game or an article for the Chess Correspondent magazine.
|
| |
| Interested readers can find Part II and Part III of the "Fight For the Center!" series on
Highlights.
|
| |
[top]
|
| |

